Welcome to Tickled Tastebuds! This page will feature a variety of recipes that includes appetizers, desserts, and everything in between. You will probably find that, as time passes and we have built more of a substantial basis here, we have a bit of a sweet tooth that is always aching to be satisfied. Dessert is definitely my favorite part of most meals, and after seeing some of our recipes, it might be yours, too, if it isn't already! With three small children at home, all of whom seem to have very Picky Tastebuds, we strive to make the majority of our recipes family-friendly, as well. Thanks for visiting us-enjoy!


Monday, January 30, 2012

Slow Cooker Chicken Chili

It is no secret that I love slow cookers… They are such a hassle-free and time-efficient way to prepare a hearty and delicious dinner that makes itself ready for your enjoyment while you spend the day at work, slaving away - or, writing blog posts… J
I honestly don't remember where I saw the dish that ultimately inspired this recipe; otherwise, I would totally share it with you. Along those same lines, however, since I never printed it or did anything more than glance at it, wherever it was, I feel confident to say that this is pretty much my own concoction at this point. And it turned out mighty tasty, too, if I do say so myself! Oh, and it's got lots of good ingredients for you, too!
Anyways, short and sweet today, but here is your basic rundown for Slow Cooker Chicken Chili…
Slow Cooker Chicken Chili
-          1 - 1 1/2 lbs chicken breast, cut into small, bite-sized chunks (or skip this step, throw them in whole, and shred them later after they're cooked, whatever floats your boat!)
-          1 8-oz can tomato sauce
-          2 10-oz cans Rotel tomatoes, drained
-          1 15.5-oz can pinto beans, drained and rinsed well
-          1 15.5-oz can black beans, drained and rinsed well
-          1 15.5 oz can sweet, no salt added corn, drained
-          1 7-oz can green chilies
-          1/2 large sweet onion, diced into small pieces
-          2 tsp. chili powder
-          1 tsp. EACH garlic powder, paprika, and cumin
-          1/2 tsp. EACH black pepper and seasoned salt
-          2 tbsp. brown sugar
-          1/2 - 1 cup water, depending on how thick you like your chili

1.       Set your slow cooker on low.
2.       In a small bowl, mix together the chili powder, garlic powder, paprika, cumin, black pepper, seasoned salt, and brown sugar.
3.       Place the chicken chunks, tomato sauce, Rotel tomatoes, pinto beans, black beans, corn, green chilies, and onion into the slow cooker and mix well. Stir in the seasoning mix and mix again. Add between 1/2 and 1 cup of water to help everything mix together well, depending on how thick you like your chili.
4.       Cook on low for 8-10 hours or on high for 4-6 hours, until chicken is cooked completely through. Top with shredded cheese and/or sour cream and enjoy!
We also made some honey corn bread muffins to accompany this, but it would be fantastic with some multi-grain tortilla chips, too! Everyone loved this stuff, and it had just the right amount of spice that even Brooklyn devoured it.
Hope you enjoy!


Saturday, January 28, 2012

Smashed Raspberry Dark Chocolate Buttermilk Pancakes

Not to sound cliche... but when I first saw this recipe posted on Joy the Baker's site, it was love at first sight. Raspberries... Dark Chocolate... Pancakes... Sunday morning breakfast... What else do you need to start a lazy day off the right way- a bit of indulgence, or as Joy says, "Breakfast Dessert." I liked that idea...  And after making these last weekend, I LOVED that idea. These pancakes will definitely be frequenting our breakfast table on a regular basis now, or at least on as regular of a basis as "Breakfast Dessert" responsibly allows...

I really enjoy finding fun ways to vamp up regular pancakes, and these were the perfect opportunity to experiment a little more, but with most of the leg work done for me this time since the recipe was close to perfect as it was.

And here is that close-to-perfect recipe now, with very minor adaptations made by me...

Smashed Raspberry Dark Chocolate Buttermilk Pancakes
(Adapted from Joy the Baker http://www.joythebaker.com/blog/2012/01/smashed-raspberry-chocolate-chunk-pancakes/)

- 1 cup all-purpose flour
- 2 tablespoons brown sugar
- 1 teaspoon baking powder
- 1/2 teaspoon salt
- 1/4 teaspoon ground cinnamon
- 1 cup buttermilk
- 2 tablespoons unsalted butter, melted and cooled a bit
- 1 large egg
- 1 1/2 teaspoon vanilla extract
- 1/2 cup dark chocolate chips
- 1 cup fresh raspberries, rinsed and sprinkled with 1/2 tablespoon EACH honey and sugar
- Maple syrup/powdered sugar for topping
- Butter on nonstick spray for griddle

1. In a small bowl, whisk together all of the dry ingredients (through the cinnamon). Set aside.
2. In a medium bowl, whisk together the buttermilk, the melted butter, the egg, and the vanilla extract.
3. After the wet ingredients are thoroughly combined, add in the dry ingredients, mixing well. Add the dark chocolate chips and set aside while you preheat your griddle.
4. After the griddle is preheated, either melt your butter on top of it or spray it with nonstick cooking spray. Drop the pancake batter about 1/4 cup at a time onto the griddle. Wait until the pancakes start to bubble, then flip and cook until browned.
5. Place cooked pancakes in a pan in the oven heated on "warm" setting to keep them hot and fresh while the other pancakes cook.
6. To serve, smash the raspberry mixture onto your plate, then top with a pancake, then more raspberry mixture, etc. Build your breakfast however you want! Top with powdered sugar, maple syrup, or just more raspberry mixture if you want! ENJOY! (And I promise you, you will...)

 I thought it was so delicious that the syrup wasn't all that necessary, and I enjoyed putting an extra few raspberries whole with some more dark chocolate chips on the top of mine. Ah-Mazing!!!

What breakfast do you enjoy the most that starts your day off with a bang? Although I was just recently introduced to these bad boys, this is now, and quite possibly forever, my favorite!

Wednesday, January 25, 2012

Peanut Butter Cup Blondies

Sweet treats are good for the soul; they nourish me in ways that little else can, and I truly believe that they are an essential part of a person's overall well-being. I am sure there are many who would blatantly disagree with this notion, but that's okay. Everyone is different, and for me, I love the indulgence of desserts, the guilty pleasure of digging into a chocolate chip cookie fresh out of the oven, the sneaky taste of some homemade cream cheese frosting before it is slathered all over pumpkin spice cake - red velvet cupcakes - er, pretty much anything to be quite honest.... I guess now would be a good time to mention the idea of MODERATION. This is key, lest I be typing to you hiding in the shell of a 500-lb body.  :)

And, with all of that in mind, it comes as no surprise that I started seeking out lighter, lower-calorie dessert treats that I could still enjoy not only baking, but also eating, even though I am trying to shed a few pounds and eat a more balanced diet. I have a subscription to the food magazine "Cooking Light," and I have not been at all disappointed with the variety of dessert options that they present for their readers. I saw these Peanut Butter Cup Blondies in the latest issue I received in the mail, and, alas, they were baking in my oven less than three days later. Go figure. They say when you know, you just know.... And I knew that I needed to make these, savor them, and enjoy every last morsel. I was actually nice enough to share with my coworkers, who were happy to sample them, ESPECIALLY after I mentioned that each bar was less than 150 calories. That's a win-win in my book.

Anyways, here is what you will need to make these Peanut Butter Cup Blondies:
(Note: Due to accurately offering a calorie count, as well as altitude issues that sometimes arise with baking brownies/blondies from scratch, this recipe has not been adapted at all and is the exact recipe that you can find in "Cooking Light.")

Peanut Butter Cup Blondies (recipe from "Cooking Light" magazine, September 2011 edition, p. 110)

- 1 1/4 cups all-purpose flour
- 1 cup granulated sugar
- 1/2 teaspoon baking powder
- 1/4 teaspoon salt
- 1/3 cup creamy peanut butter
- 1/4 cup butter, melted and slightly cooled
- 2 tablespoons 2% reduced-fat milk
- 1 teaspoon vanilla extract
- 2 large eggs, lightly beaten
- 1/4 cup semi-sweet chocolate chips
- cooking spray
- 4 (0.75-ounce) peanut butter cups,  coarsely chopped

1. Preheat oven to 350 degrees F.
2. Combine flour, sugar, baking powder, and salt with a whisk. Set aside.
3. Combine peanut butter, butter, milk, vanilla, and eggs in a separate bowl, mixing well. Add peanut butter mixture to the dry ingredients and stir until just combined. Mix in chocolate chips.
4. Spread mixture into a 9-inch square pan that has been prepped with cooking spray. Sprinkle the chopped peanut butter cups over the top, lightly pressing them into the mixture.
5. Bake in preheated oven for 19 minutes, or until a toothpick inserted in the center comes out clean. Cool in pan on a wire rack. Cut into 20 bars and serve. (Each bar equals 153 calories!!!)

I actually made this recipe times one-and-a-half and then baked the blondies in a regular 9x13" cake pan so that I would have more to share. They turned out absolutely fantastic. The texture was fabulous, although, personally, I think that they were more of a cookie bar consistency than the dense consistency typically found in a blondie. They were very light and fluffy, for lack of a better word, and they were very satisfying even though they were on the lighter side of the dessert fence. Even Chris, who usually shies away from blondies because he is such a die-hard brownie fan, enjoyed these scrumptious, peanut-butter-and-chocolatey bars. I have said it before, but I'll say it again: whenever I get his stamp of approval on a dessert, I really consider it a winner and a keeper. These will definitely be bookmarked for future baking endeavors, and I am looking forward to trying the other three sinful-sounding brownie bars that were in that same issue of "Cooking Light." I am sure you will hear more about those later! 

On an ending note, someone needs to remind me to take some ginko biloba or whatever the heck that stuff is called. I need a memory boost and then some. I forgot AGAIN to take a picture of these beauties before they were all gone. It really made me sad (as lame as that may sound) because they really were picture perfect. Promise I am going to try harder to start remembering this key step in the successful food blogging process...Forgive me?

P.S. My soon-to-be mother-in-law got me some FANTASTIC food blogging and food photography books for Christmas, so please keep your fingers crossed that the wisdom hiding between the covers of those books will rub off on me soon and my pictures will improve dramatically! :)

Friday, January 20, 2012

Lemon Blueberry Muffins

Lemon Blueberry Muffins

As part of my recent goals to get healthier and drop a few pounds in the process, I have been scouring the web and my ridiculous collection of cookbooks for healthier, lighter recipes that will still allow me to practice my passion for baking while obtaining my goals. We had company coming into town last weekend, and a brunch at our house for Sunday was planned. I thought that some muffins would be a perfect accompaniment to yogurt, granola, fruit, and an assortment of juices. I found this recipe for Lemon Blueberry Muffins and it sounded perfect. I LOVE the flavor combination that results from mixing lemon with pretty much any kind of berry.
These muffins are moist, delicious, and full of ingredients that have a nutritional benefit, so although they may not be low-calorie, at least the calories you are ingesting are serving a purpose! The original version of the recipe that I used to base my adaptation off of can be found on The Kitchen Magpie's website at http://www.thekitchenmagpie.com/lemon-blueberry-muffins-lighter-version.
Here is what you will need to make these scrumptiously light and tasty fruity muffins:
-          6 oz. container lemon yogurt (or lemon Greek yogurt, if you can find it)
-          2 tbsp. melted unsalted butter
-          Juice of 2 lemons
-          1 egg
-          1 cup whole wheat flour
-          1/2 cup all-purpose flour, sifted
-          3/4 cup white sugar
-          1 tbsp. baking powder
-          Dash of salt
-          Zest of one lemon
-          1 cup chopped, fresh blueberries
-          1 small (coffee-sized) packet of Truvia, Splenda, or other calorie-free sweetener
-          Splash of lemon juice

1.       Preheat oven to 375 degrees F. Line 12 muffin tins with muffin cups. Set aside.
2.       Start by preparing your blueberries first. After they are cleaned and chopped, sprinkle the packet of Truvia and the splash of lemon juice over them and give them a good stir. This will add a ton of flavor and create almost a syrupy effect with the berries that is just delicious. Set aside.
3.       Whisk together all of the dry ingredients, including the lemon zest.
4.       Combine the yogurt, melted butter, lemon juice, egg, whisking well. Add to the dry ingredients and mix well.
5.       Gently stir in the blueberry mixture, folding in until just incorporated and well distributed throughout the batter.
6.       Fill muffin cups 2/3 full with batter. Bake in preheated oven for 15-18 minutes until the tops spring back when touched and are lightly browned.
7.       Remove to wire rack to let cool, spread with a little butter or yogurt, and enjoy!
Lemon Blueberry Muffins that are about to be devoured by the hungry two-year old, Brooklyn :)

What are some of your favorite flavor combinations for muffins? Do you have a go-to recipe that you love, or do you enjoy experimenting with new ones? Any in particular that you would like to see here?
Hope you all have a fantastic weekend! Personally, I am looking forward to a much-needed date night kid-free on Sunday! Woo-hoo!

Monday, January 16, 2012

Shredded Beef Sandwiches with Balsamic Coleslaw

I love pot roast. I love it in the traditional carrot and potato sense, and I also love the limitless possibilities of other ways to prepare a good roast. Last week, Joy the Baker made shredded roast beef sandwich of sorts and it looked fantastic. It inspired me to put one on the menu for our house for a nice Sunday dinner, and the recipe that Chris and I ended up coming up with was absolutely delicious. It felt like comfort food, but in all reality, was not that bad in the bigger scheme of health-conscious food choices.  Even better, this beauty simmers all day in the slow cooker, so there really is little to no "real" work involved for you!
Chris really has a talent when it comes to sauces, marinades, and preparing meat, in general. Some of the concoctions he comes up with sound absolutely bizarre, but they always turn out amazing. The subtly sweet flavors in the roast paired perfectly with the slight tang of the coleslaw we topped it with. Anyways, the main point of this little side note is that this recipe is really more of Chris's than mine, but since he doesn't blog about food like I do, it's getting posted on my site! He was happy to share, of course. J
Here is what you will need to make Shredded Beef Sandwiches with Balsamic Coleslaw:
For the meat:
-          3 lb. beef roast (use your favorite cut, the less fat the better)
-          32 oz. (one large box) reduced-sodium beef broth
-          1 sweet onion, peeled and sliced into wedges
-          1 tsp. garlic powder
-          1 tsp. black pepper
-          1 tsp. seasoned salt
-          1 tsp. paprika
-          3/4 cup brown sugar
-          2 tbsp. reduced-sodium soy sauce
-          2 tbsp. worchestire sauce
-          2 tbsp. balsamic vinegar
-          2 tbsp. honey
For the coleslaw:
-          1 regular size bag of Dole Coleslaw Mix (dressing packet included)
-          1/4 cup balsamic vinegar
-          1/4 cup olive oil
-          1/4 cup brown sugar
-          2 tbsp. dressing mix from Dole included in bag
Also:
-          8 whole wheat hamburger-style buns
-          Oven fries for a delectable side

1.       Set your slow cooker on high. Rub all sides of the meat with the garlic powder, black pepper, seasoned salt, and paprika. Place the meat into the bottom of the slow cooker. Cover with the entire 32 oz. of beef broth and the onion wedges. Add the brown sugar, soy sauce, worchestire sauce, balsamic vinegar, and honey and give everything a little stir. Cover with the slow cooker lid and let cook for 3 hours on high.
2.       After 3 hours has passed, reduce heat to low. Pull out the roast and shred into bite-sized pieces. Put the shredded meat back into the broth mixture and continue to cook for another 3-4 hours on low. This will allow the meat time to really soak up all the goodness that the flavored broth has to offer.
3.       After your meat is done, mix the balsamic vinegar, olive oil, and brown sugar in a small bowl or jar. Pour the bag of coleslaw mix into a medium bowl and gradually add the balsamic mixture until you have the desired flavor, then again slowly add the dressing mix until the balance of flavors is suited to your taste. We liked ours with a little more tang to contrast the sweetness of the roast.
4.       Toast up your whole wheat buns by placing them in the oven for just a minute or two to give them a nice crisp. Top each bun with shredded beef and coleslaw, then enjoy! As mentioned above, I definitely recommend the oven fries recipe shared earlier as a perfect side for this hearty sandwich. The sandwiches were also delicious with just a tiny spread of barbecue sauce on the bottom/meat side of the bun.
Let me know what you think of this super easy and delicious meal! Our whole family enjoyed this one all around, and we all felt full and satisfied after devouring our sandwiches.
What are some of your favorite slow cooker meals?  

Friday, January 13, 2012

For Granola Fans Like Me....

I. Love. Granola. I love granola bars. I love granola in yogurt. I love granola with fruit. I love granola on ice cream. I love how the more times I type granola, the more it starts to seem as if it really isn't a word... Anyone else ever have that happen? I get it a lot with purple, too, although, I must say I don't really type purple often...weird.

Anyways... IF you enjoy granola as much as I do, I HIGHLY suggest that you try making your own. It is quick and easy and so adaptable that you can put your favorite ingredients in it and the outcome will still be delicious and nutritious! Granola is definitely a staple for me, and my family really enjoys it, too! I only recently made it from scratch for the first time at home, but I am eagerly looking forward to playing around with all of the different possibilities that are out there, infinite as they may be!

Eventually, I will share my own granola recipe with you, but for now, I want to share with you a few other sites that have granola recipes that I think look positively delicious and will more than likely be trying out myself!

From the ever beloved Food Network, Alton Brown offers his recipe for tasty, homemade granola.
At  http://www.cookiemadness.net/category/granola-recipes/ , you will find several different granola recipe variations all in one place. How handy is that! 

From one of my personal favorite bloggers comes a recipe for Cherry Chocolate Coconut Granola. How delicious does that sound? Thinking this might be a fun Valentine's Day treat to put in little bags for coworkers instead of the normal assortment of sweets with little-to-no nutritional benefit? Maybe... http://annies-eats.com/2012/01/09/cherry-chocolate-coconut-granola/  

And finally, from another of my favorite food bloggers, is a Granola Cookie recipe, which the Brown Eyed Baker describes as "genius." Be sure to check these out!
Try some of these out and come back and let me know what you think! I would love to hear how your experience with making granola goes, and as mentioned before, I will share my own recipe with you soon! Have a fantastic weekend!

Wednesday, January 11, 2012

Chicken Quesadillas

Every once in awhile, the nights when the primary goal of dinner is to use up as much of the pantry ingredients as possible in one dish end up being the nights with the best meals. Enter my chicken quesadillas. I have no fancy name for them. They are quesadillas, plain and simple. But they are tasty, and they will speak for themselves once you take a bite of one!
We have definitely been trying to be more aware of what we are putting into our bodies, and hopefully, rather than this being a yearly attempt at what eventually becomes a failure, the changes we make will be lifestyle rather than temporary and we will be able to come up with some better resolutions next year! I think my head is finally in the right place to make this type of commitment a permanent change, especially when I consider the children we are growing at our house. With that in mind, these quesadillas are full of good ingredients that will fill you up quickly and leave you feeling satisfied.
I apologize in advance- no picture for these. Next time I make them (which will probably be soon because they were so delicious), I will definitely take a picture to share with you all.
Chicken Quesadillas
-          6 whole wheat tortillas (10" size)
-          1 lb. cooked chicken breast, shredded or cut into small pieces
-          1 red or orange bell pepper, seeded and diced
-          1 cup corn, drained and rinsed
-          1 cup black beans, drained and rinsed
-          1 cup Rotel tomatoes
-          1 tsp. each cumin, chili powder, and garlic powder
-          1/2 tsp. each seasoned salt, pepper, and paprika
-          1 cup of your favorite Mexican cheese blend
-          1 tbsp. olive oil for skillet

1.       Heat olive oil in skillet over low-medium heat. Add chicken, bell pepper, corn, black beans, and tomatoes. Add seasonings and mix well to combine. Heat until mixture is warmed through.
2.       In a separate skillet large enough to place your tortillas in, heat to medium. Place one tortilla in the bottom of the skillet (no oil is needed). Sprinkle a couple tablespoons of cheese over one-half of the tortilla, then top with 1/4-1/3 cup of the chicken mixture. Sprinkle again with a little cheese, just enough to help bind the tortilla. Fold the empty half of the tortilla over the filled side and press down firmly with a spatula to flatten and shape the quesadilla. After about 15 seconds, flip the quesadilla over to other side and hold for an additional 15 seconds.
3.       Remove to a plate to cool slightly, then cut into four pieces. Serve with a mixture of light sour cream and fresh salsa and enjoy!
Note: You can save the remaining corn, black beans, and tomatoes from the cans used in the fridge in an airtight container and toss with fresh Romaine, tortilla chips, and fresh salsa for a quick weeknight salad!  

Monday, January 9, 2012

Starting the New Year Off Right!

2012 is officially here. Each new year fosters new goals, new ambitions, and the refreshing idea that we each get a new start; it's a time to wash our hands of past mistakes and rid ourselves of bad habits that may be holding us back or hindering us in some way. For some of us, these ideals take the form of resolutions. For others, there is a general conception that often times resolutions fail, and so goals are made to make healthy lifestyle changes that last rather than making a resolution that runs a short-lived course. Whatever the case may be, many of us find that the new year ushers in a want and a desire to make healthier life choices, whether they be in relation to food, exercise, time management, or mental health and spirituality. There are many pieces to the overall health puzzle, and each piece plays an equally important role in the overall quality of the end result.
Naturally, the focus of this blog is food. It's no secret that I have an unabridged love for desserts and anything that offers satisfaction for my sweet tooth. Don't worry- just because the focus of the new year will be healthy food ideas, I will never go without sweets, nor would I ever suggest that you do! I believe that EVERYTHING is good for you in moderation, and for me, an occasional indulgence is the ONLY thing that keeps me on track in the bigger scheme of things. In other words, there will still be plenty of dessert recipes to come in the midst of some of the lighter meal ideas I will present to you.   
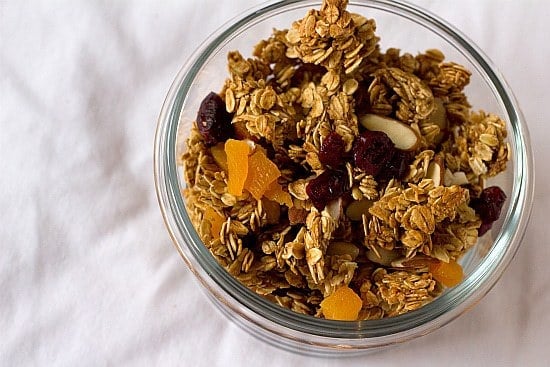
With that in mind, I would like to take the opportunity to direct your attention to a unique website (unique, at least, in that it's being mentioned in a food blog while its focus is primarily scientific in nature)… I stumbled across this page on one of my personal favorite food blogs, Brown Eyed Baker. She contributed a recipe for homemade granola to the Posit Science Thinkfood: Brain fitness recipes cookbook, along with 49 other noted food bloggers. The collection of recipes here is widely varied from cookies to fish to enchiladas and everything in between. What I think is fantastic about this particular collection of recipes is its objective: food concoctions that are not only delicious but put forward combinations of ingredients that actually boost your brain power and offer substantive value in addition to taste. In my opinion, this type of emphasis is the key to building a healthy diet. There is much more to losing weight and/or feeling good than calorie-counting alone. You can find the compilation of recipes here: http://www.positscience.com/human-brain/brain-fitness/thinkfood-recipes, or, take the scenic route and visit Brown Eyed Baker's delectable site in the process: http://www.browneyedbaker.com/2011/03/23/fruit-almond-granola-recipe/.
Above, a picture of Brown Eyed Baker's contribution to the Thinkfood cookbook - Fruit & Almond Granola- looks delicious!

Along this same line of thinking, I would also like to offer one additional website for your health-oriented perusing: http://www.nutritionwithsheila.com/. I have personally sought out the advice of this wise, self-employed Nutritionist and found the insight that she can offer invaluable. In fact, many of the ideas I have regarding healthy eating come from Sheila's coaching. Follow her on Facebook for daily pointers on how to incorporate more nutrition into your diet and lead a healthier lifestyle, in general. She is very knowledgeable about the true, hidden power that can come from the nutrients we put in our bodies when we eat with a purpose.
In the meantime, tell us about your 2012 goals or resolutions, or if you choose not to participate in the seeming new years' traditions, tell us why. Look forward to a new recipe on Wednesday, and be assured it will be full of good-for-you ingredients!